Why do we need roles?
Imagine that you and a friend of yours are managing a website. Maybe you are a successful web designer whereas your friend has no idea about CSS but is a committed writer. Therefor, you have decided to share the work. In the future, you will be doing the design and administration of the website and your friend will be writing articles. This is a basic principle of any CMS by the way - separation of content and design.Now, as both of you have to have access to the back end, your friend would still be able to edit the look of the website or to create new user accounts, although he is actually not responsible for design or administration. Therefor, you want to disable these functions for his account. At this point, you have created a role (although it exists in your mind only) that you could name "editor" or "author".
To learn how user permissions can be restricted, let's take a closer look at the roles of our example users.
1. Kevin Jones
He is the administrator of the website and he can access all modules and functions. To create an administrator account, simply create a new user and check Administrator.

2. Helen Lewis
She is a teacher and responsible for her course "Violin Master Class". Each course has its own page, its own news archive and its own calendar. And all these resources are visible to the students of the respective course only. In addition, there is a general courses page that can be accessed by all students and edited by all teachers.
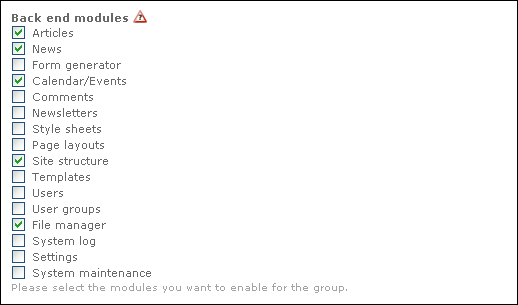
Since Mrs. Lewis is not the only editor, it is useful to create a role (user group) called Editors. Open module "User groups" and take a look at the Editors group. As you can see, there are only a few modules activated. Each editor (teacher) has access to the navigation module (to modify pages), the articles module (to create content on the pages), the news module (to create news items), the calendar/events module (to create events) and the file manager module (to upload images or documents).

In addition, Mrs. Lewis is allowed to access the general news archive and calendar as well as the news archive and calendar of her course "Violin Master Class". This access control feature is actually new in Contao version 2.5!

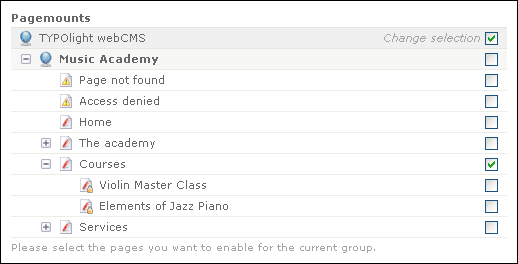
Contao is a tree-based content management system, meaning that each front end page refers to a page in the hierarchically ordered site structure. Administrators can always see the whole page tree, whereas users, by default, do not have access to it at all. To enable one or more pages for a user, you have to "mount" them into his profile. The same applies to the file manager and the folders of the upload directory.
Since we want Mrs. Lewis to be able to edit the courses page and the page of her own class, I have choosen page Courses as mounting point (subpages are included automatically). If you log in to the back end as Mrs. Lewis, you will only see those three pages in the site structure.

3. Jamie Wilson
She is an country singer and therefor also a back end user (editor). Like Mrs. Lewis, she is in charge for the courses page and his own course "Elements of Country". Since all editors share the same user group, Mrs. Wilson can also see Mrs. Lewis' page in the site structure. However, she is not able to edit it.
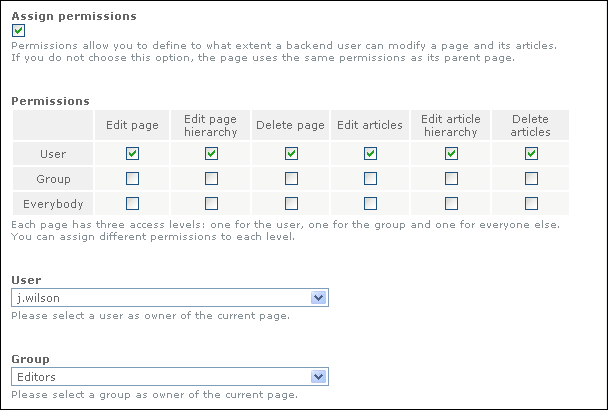
Now let's log in to the back end as Kevin Jones (administrator) and open the site structure module. Go to page Elements of Country and edit it. There is an option called "Assign permissions" which you should not have seen when you were logged in as Jamie Wilson. Here you can set the owner of a page (a user and a group).

There are three ways to relate to a page: as the user who owns the page, as the group who owns the page or as someone else. Each role has its own set of permissions (similar to the UNIX chmod utility).
Of course, page Elements of Country belongs to Mrs. Wilson and he is the only user who is allowed to do something with it (remember that administrators have access to all pages and modules at any time).
4. John Smith
He is a Piano student and he attends Mr. Wilson's class. If you log in to the front end as John Smith, you will recognize three additional pages in the website navigation menu that were not visible before (Elements of Jazz Piano, My account and Logout). These pages are protected and therefor not visible to guests.
Go to the back end again, open the site structure module and edit page Elements of Jazz Piano. You will find the options "Protect page" and "Allowed member groups" which let you grant access to one or more member groups. If you do not choose a group at all, the page will be visible to any logged in front end user.

5. Donna Evans
She is a Violin student and she attends Mrs. Lewis' class. On the protected page My account you can change Donna Evans' personal data using a front end module called "Personal data". Note that there are back end modules as well as front end modules and that both provide different functionality.
Now, here is the general rule how to set up pages in Contao. Each page has a page layout and each page layout includes one or more front end modules and style sheets. Thus, you should create pages in the following order:
a. Create all necessary front end modules
b. Create all necessary style sheets
c. Create a page layout and include your front end modules and your style sheets
d. Create the page and include the layout
Open the page layouts module and take a look at the default layout. You can choose between a one column, a two column or a three column layout and you can add an optional header and footer. The Contao CSS framework will automatically divide your page into the selected "layout sections".

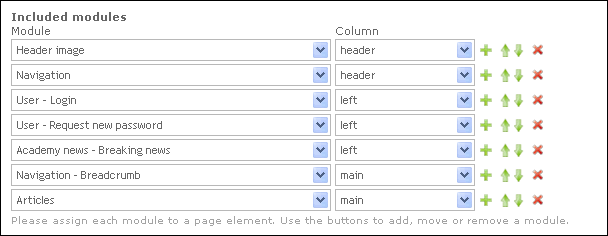
Once you have choosen the basic page layout, you can add front end modules to your layout sections. Front end modules will be shown one below the other, so you can change the order within each column here.
Below is a screenshot of the modules included in the default layout.
